4.1 Introduction to HDR
An important element for realistic physically based rendering is the using of high-dynamic-range (HDR) images. So far in our series, this is approximated by ordinary low-dynamic-range images to produce some sample results and to verify the correctness of the algorithm. However, since high-dynamic-range images require floating-point picture format, the reading and processing of the source images need to be redesigned. In addition, since the built-in GLSL shader cannot directly read data from floating-point textures, the textures need to be compressed and encoded into integer formats like PNG, which is also the scope of research.
Light intensity in real-life scene has a huge range. Sun as a light source has a ~109 cd/m2 luminance, while the intensity of average starlight is below 0.001 cd/m2. However, common digital images (e.g. BMP, JPEG) have only 24-bit color depth, i.e. each color channel has a 0-255 integer range. Therefore, the range of light intensity a normal computer image can represent is rather limited.
Dynamic range is such a unit that measures the scale of color intensity difference across a picture. It is defined as the logarithm of the difference of highest and lowest pixel luminance (in RGB color space, a formula of luminance is 0.2126R + 0.7152G + 0.0722B). Following this definition, a JPEG image has a dynamic range of only 2.4, while real-life scenes often have a value above 9. The former one is often referred as low dynamic range (LDR) image and the latter one is referred as high dynamic range (HDR) image.
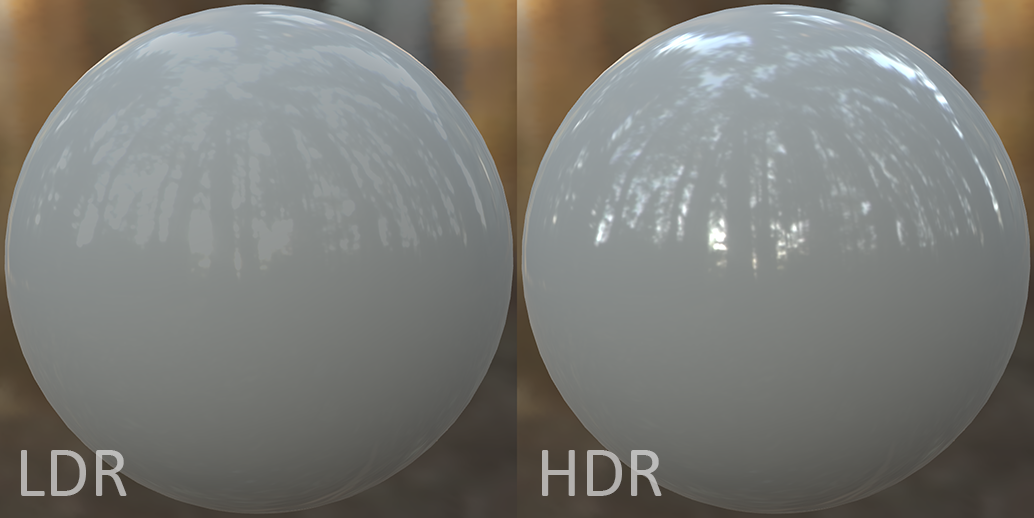
Because in PBR most we use a great amount of image-based lighting, we need to use HDR images to achieve real-life lighting effect. With LDR images, one can barely feel the existence of a light source present in the photo. It is even worse when the object has low metalness - whole lighting becomes dim and unrealistic. With HDR images and proper conversion techniques, these problems can all be solved.
HDR images use floating point number to represent a pixel, which gives it an almost full coverage of real-life light intensities. However, there are also different floating point formats, which we will explain in next section.
4.2 Floating-point Image Formats
Common floating-point image formats include FloatTIFF, Radiance RGBE and OpenEXR. Each of the three formats has its advantages and disadvantages. However, we are going to pick the format that is most suitable for our needs.
The FloatTIFF is a special extension of TIFF (Tagged Image File Format) to support floating point images that is specified in the tag of the file. In FloatTIFF, each color channel is represented by 32 bits, i.e. 96 bits in total for an RGB image. Despite its high fidelity, TIFF is blamed for its huge size, since compression is rarely used due to compatibility reasons. It may not be a good choice since our system needs to be transplanted into mobile platform and big files can lead to slow reading speed.
Radiance RGBE is a popular HDR image format originally developed by Gregory Ward Larson for his Radiance ray-tracing software system. The RGBE format is unique for storing the intensity in a separate channel (E for exponent), while the rest RGB channels maintain the color ratio same as in LDR images. RGBE format has an advantage for its small size (8 bits for each channel, 32 bits in total). Although RGBE is good for its small size and wide dynamic range, the trade-off is lower color accuracy.
OpenEXR is an HDR standard developed by Industrial Light & Magic. There are two sub-types: half float (16 bits) and full float (32 bits). The former one is more commonly used for its smaller size and enough accuracy for game level rendering. The 16 bits are divided into sign (1 bit), exponent (5 bits) and mantissa (10 bits). OpenEXR supports a dynamic range of 12, which exceeds the capability of human eye. Meanwhile, it support ZIP compression, which is lossless. This format is also widely supported in different software. Blender can bake images in half and full OpenEXR format. OpenCV also supports automatic conversion of the half float to full float for its internal processing. Due to the aforementioned advantages, we decide to use OpenEXR as the standard format for HDR images in our system.
4.3 Processing HDR image in OpenCV
Given the source code of irradiance map and pre-filtered environment maps generation for LDR images, only a few changes need to be made to fit it into HDR processing. The trickiest one is that the second argument of cv::imread needs to change into negative number to indicate the function to read the image as raw data. Otherwise, OpenCV will treat the floating number as integer value so that the image cannot be correctly represented. When creating cv::Mat, the data type should be chosen as CV_32FC3, which is compatible to both half and full float OpenEXR images. Since our environment map does not contain transparency information, the alpha channel can be safely ignored. In addition, when fetching pixel intensity from cv::Mat using “at” method, the return type tag need to change to cv::Vec3f instead of cv::Vec3b.
The calculation functions need not to be modified since they are physics-based. As long as the value is proportional to the luminance (the physics unit), the result is correct relative to the source. However, special attention needs to be paid into the sampling process in numerical integration. The accuracy of result is affected by the number of samples taken in Monte Carlo integration. For LDR images, 1024 samples are enough for a good approximation. When it comes to HDR images, it depends on the actual dynamic range to decide the number of samples. To determine the number of samples as a function of dynamic range is mathematically complicated. However, we can use experience to estimate a threshold for most images. In some cases (dynamic range > 10), number of samples exceeds 1 million, which is extremely expensive in terms of time. Unfortunately, such case cannot be ignored as it often appears in dark room lit by an intense light source. If the number of samples is as same as that for LDR images, many bright noise points like fireworks will appear around the intense light source. To deal with this, we need to consider dynamic range compression.
4.4 RGBM Compression
From the former section we know that compression is important for HDR imaging used in game level rendering. However, since our Godot game engine only supports PNG and WebP textures, we need to encode our HDR image into these LDR formats. Fortunately, there is a solution provided by Brian Karis (2009) that solves both problems, called RGBM encoding.
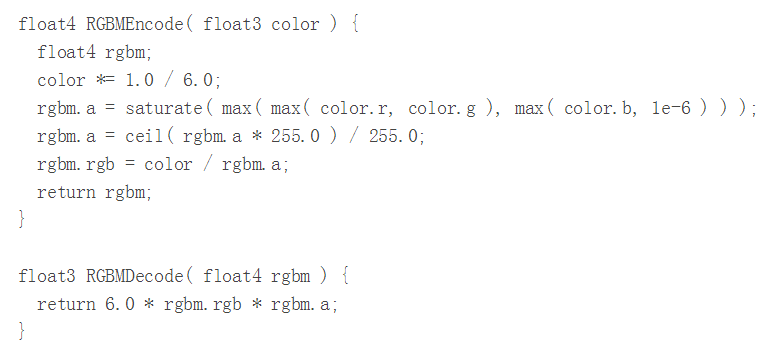
The encoding algorithm is simple, as shown in the image above. The basic idea of this algorithm is storing a multiplier in the alpha channel, which is determined by the largest value from R, G and B. The compression is applied when you use saturate function to the maximum value. It is easy to see that the maximum possible value after compression is the constant 6.0, since all colors are divided by 6.0 at first. Therefore, we can also treat this as the compression rate. If we want to preserve higher dynamic range, we should increase the value. However, this is at the expense of loss of color accuracy. In my implementation, I found that 36.0 is a good choice to balance these two factors.
With this technique, we can export our HDR images as PNG textures with alpha. In game engine, we simply need to enable the alpha channel and decode the texture as the figures shows. The constant in front should be our chosen compression rate.
4.5 Tone Mapping
There is still an issue we need to deal with. Since an HDR image records the real intensity of pixels, we need to map it into sRGB space to show it on the screen, which is called tone mapping. The resulting image looks more vivid since it combines details of all parts like human eyes do, creating the feeling of a wider dynamic range. To understand tone mapping, we must first introduce some concepts: exposure, gamma correction and white balance.
In photography, an HDR picture is often the composition of several photos of different exposure values (EV), for the same scene. Defined by  , where N is relative aperture (f-number) and t is the exposure time in seconds, exposure value is inversely proportional to the amount of exposure. The larger the aperture is and the longer the exposure time is, the smaller the EV is, i.e. there is a greater amount of light coming in. The decrease of 1 EV is also called increase of 1 “stop”. In HDR imaging, usually 3 to 5 pictures in the range of -2~2 stops are taken, to capture the enough range of lighting conditions. In larger EV, overexposure can be avoided for the very bright parts like object lit directly by the sun. Conversely, in lower EV, dark areas can preserve more details. Software like Adobe Photoshop can be used to compose the HDR image from the several LDR images, during which each pixel is assigned a float value that is directly proportional to the real light intensity, without color correction for display.
However, to present a HDR image on the screen, a process called gamma correction must be done. This concept comes from the interesting fact that the human perceived light intensity is not the real light intensity. Stevens’ power law indicates that for magnitude of sensation stimulus (S) and physical intensity (I), for some power p. Image captured by digital device records the physical intensity. Therefore, when presenting the image on screen, the intensity value must be taken to the power of 1/p to recover the sensation effect of that intensity. Current sRGB pictures are already encoded with the gamma, i.e. the RGB values are already powered by 1/p. In sRGB standard, p is equal to 2.2. However, for HDR images, the gamma correction is not applied; the floating values record raw intensity. Therefore, we must apply gamma correction in tone mapping process, which is both important for having a more realistic result and color blending with LDR textures in game.
White balance is another necessary process, which is also related to human visual perception. Different global illumination conditions have slight impact on the reflected color of objects, but human eyes tend to recover the material color (or diffuse color in PBR), which is often measured by the magnitude of compensation for white color. For example, in cloudy condition, the white objects seem to have colder color while in sunlit condition, they have warmer color. Therefore, in tone mapping, we may want to compensate some red color for cloudy condition to make the object preserve its original color so that the whole scene looks more natural, which is called white balance. While some images may be taken by white balanced camera, the display color temperature can be another factor that requires us to do white balancing.
Having these HDR data and knowing the aforementioned factors, how are we going to present the picture on screen? Actually, it depends on our purpose. Some algorithm based on human visual perception system produces more realistic image, while others may present a more artistically pleasing result (in which the contrast of color is stronger). Since we pursue realistic rendering, we prefer the former one. A solution provided by John Hable (2010) at Filmic Games has nice realistic render results. The algorithm takes two parameters – white balance level and exposure compensation, which can be determined empirically. In my implementation, I take 1.0 as white balance level and 4.0 as exposure compensation.
In PBR, metalness value is directly multiplied with the HDR float value, which is equivalent to the using of a different exposure value. Therefore, with non-metals, bright parts like light sources often remain bright (the halo is reduced) while darker environment is almost invisible, just like what we see in real life. However, there is one tricky part. Since we are working with LDR textures like diffuse maps, reverse gamma correction must be applied on those textures (by taking a power of 2.2) due to the encoding for sRGB color space.
References
Hable, J. (2010, May 5). “Filmic Tonemapping Operators” [Online blog post]. Retrieved from http://filmicgames.com/archives/75.
Karis, B. (2009, April 28). “RGBM color encoding” [Online blog post]. Retrieved from http://graphicrants.blogspot.sg/2009/04/rgbm-color-encoding.html.
List of Figures
Figure 12: Comparison of PBR using LDR and HDR environment maps. Source: http://gamedev.stackexchange.com/questions/62836/does-hdr-rendering-have-any-benefits-if-bloom-wont-be-applied.
Figure 13: RGBM Encoding Function. Source: screen capture of http://graphicrants.blogspot.sg/2009/04/rgbm-color-encoding.html.