Deferred shading have been known to largely boost the efficiency of rendering when treating a large amount of lights. The mechanism is very simple: separate the geometry complexity from lighting. To do this, G-buffers which form an array of textures, often including position, material color, normal of the points to shade, are rendered in the first pass from the point of view. Then, an orthographic camera are used to render a quad that covers the whole screen. The normalized (0-1) screen coordinates are then used to retrieved the geometry/material data at the point of the screen, which is fed into the lighting function. In such a way, we avoid producing tons of fragments from the projected scene geometry, instead, only render those which are visible.
However, imagine we have a large group of lights. We’ll still have to go through the whole list of lights for each screen pixel. With a more physically based lighting model, in which each light has a influential radius (resulted from the physical fact that has an ideal point light source has inverse squared drop-off), fragments that are outside a certain light’s influential radius would waste time on waiting other fragments in the same batch to go to a different branch. We know that branching is bad for GPU. This leads to a severe time penalty. Many techniques have been proposed to alleviate this problem. Tiled deferred shading is a very popular method, probably most of you have heard of. It partition the screen into tiles and create a “light list” for each tile using only the lights that intersect with the tiles. This is of course an elegant method. However, we will always need to do some preprocessing before generating a new group of lights (if there is a need to).
A simpler solution is volume deferred shading. We just need to render “light volumes” for each light, which, as you might guess, can be a sphere with a radius equal to the light’s influential radius. For example, in OpenGL, we just need to create a list of vertices/indices of a sphere and prepare a model matrix for each light (which is simply scaling and translation). While rendering, we perform the draw call n times, where n is the number of lights. One such light volume will produce fragments that covers the specific region on the screen where the fragments are possible to be shaded by the light. Of course, by doing this we are losing the depth dimension. We have to explicitly test the fragments and make sure they are at about the same depth region of the light (which is only a necessary condition). Of course, tile rendering also require such testing, but if we have lights scattering everywhere in a very “deep” scene, the lights to be tested are significantly lesser. However, because no preprocessing are required, volume deferred shading have quite competitive performance in most cases.
Wait! We should not render n passes! Instead, a better way is to use the instancing function which is supported on every modern graphics card to avoid the latency caused by lots of communication between CPU and GPU. Also another important thing, depth write should be disabled and additive blending should be enabled. The reason that depth write should be disabled is that light volumes are not real geometry. While two light volumes are close to each other and are illuminating the same region of the scene, we don’t want them to occlude each other such that some part are only shaded by one of the light volumes.
If you do the volume deferred shading described above directly, we will immediately discover that something goes wrong. When you approaches a light’s location (with a moving camera), at some point the screen will suddenly be darkened. This is because no matter you turn backface culling on/off, you will fall in a dilemma that you either render the pixels twice as bright when you are out of the light volume, or not render anything when you are inside the light volume.
It turns out that this situation can be easily solved by switching the culling mode to front-face culling. However, this is not good enough. We can actually keep the Z buffer created by G-buffers rendering and use this information perform some rejection of fragments that are not intersected by light volumes. Here is a nice stencil buffer trick introduced by Yuriy O’Donnell (2009). What it do is basically using the stencil buffer as a counter to record whether the front face of a light volume is behind the visible scene geometry (so that it has no chance to shade the pixel). This is achieved by only rendering front faces (with color buffer write disabled) in the first pass and add 1 to the stencil of the Z-failed pixels. Another situation is that the backface of a light volume is before the visible scene geometry, which is solved by the second pass - rendering only back faces and use a Greater/Equal z-test to continue filter the final pixels from the pixels with a zero stencil value (already pass the first test). So that we can keep only the light volume pixels that “fail” the z-test (the original “LESS” one), which intuitively corresponds to the scene geometry-generated pixels that intersects with the light volume. Notice this trick also works when you are inside a light volume, in which case front faces won’t get rendered (it is illogical that the fact that we are inside a light volume and that the front face is behind the visible geometry hold at the same time!), leaving a zero stencil value that allow us to use Greater/Equal depth test only to filter the pixels to be shaded. Of course, in either pass we need to disable Z write. Certainly we don’t want the light volumes bumping into each other.
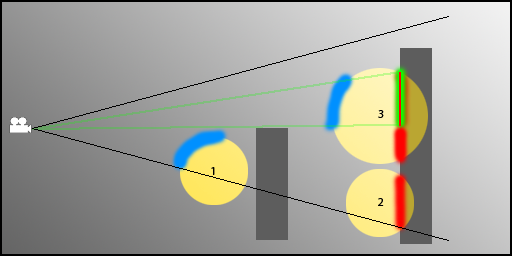
While this trick definitely increases the efficiency especially when the lighting situation is very complex, we can do something better. Often modeling a detailed sphere as polygon creates large number of vertices that cram up the pipeline. Instead, we can use a very coarse polygon-sphere (e.g., with 4 vertical/horizontal slices) with a slightly larger radius to ensure that the light volume is bounded correctly. We can even use just a bounding cube of the light volume! Of course, the least thing we can do is just use a quad. However, that gives up some aforementioned depth test benefits and it also involves some complex projective geometry. Just for fun, I also prepared a derivation of the axis-aligned screen space bounding quad of the projected sphere.